Getting Started With CakePHP


Why CakePHP?

CakePHP is an open-source framework for PHP intended to make developing, deploying and maintaining applications much easier. CakePHP offers many useful design patterns, such as the Model-View-Controller pattern..

  • Model-View-Controller layout.
  • Easy CRUD (Create, Read, Update and Delete) database interaction.
  • Scaffolding to save production time.
  • Search Engine Friendly URLS.

1) Download The Framework:

Before you start developing with CakePHP you will need your own copy of the framework uploaded to your server. Visit CakePHP.org and click the large “Download” button. Make sure to download the stable release and not the release candidate.

It will continue in next post.

Working with URL aliases in Drupal 7


Drupal allows you to further customize your website by setting up search engine optimized URLs called aliases. In this tutorial, I’ll explain further what URL aliases are and how you can use them in your Drupal 7 website.

What are URL Aliases

URL aliases allow you to provide a more understandable URL to content such as pages and articles in Drupal..

How to enable URL Aliases in Drupal 7

    1. Login into your Drupal Site
    2. Go to Configuration >> Search and Meta Data >> URL Aliases
    3. Click Add alias

drupal_url_alias_3

  1. Fill in the Existing system path and the Path alias
  2. Click Save.
That’s all ..  Check your url …

Redirect a users to another page using PHP


You can use a simple PHP script to redirect a user from the page they entered to a different web page.
Using this method, they can be seamlessly transfered to the new page without having to click a link to continue.
Benefits:
  • Users are redirected quickly and seamlessly.
  • When using the ‘Back’ button, the user is taken to the last viewed page, not the redirect page.
  • Works on all browsers.

Coding:

<?php

header( ‘Location: http://www.yoursite.com/new_page.html&#8217; ) ;

?>

That’s all.. Check it..

Template your site using PHP


I hope all that this post will help to maintain our php scripts in our projects..

This is very simple to follow..

What it does?

When every page of your website follows the same design theme, it is often easiest to create a template for the site. The specific pages of the site only hold their content and not their design. This makes design changes easy, as they take place on all the pages at once, and there is no need to individually update specific pages.

Steps :

1) The first thing you need to create a file called header.php . In this file you will hold all your page design that comes before  your content

  1. <html> <head><title>My Site</title></head> <body> <h2>My Site Title</h2><p> your content goes here........... <hr>
    2)Next we need to make a file called footer.php. This file will contain all of the site design information that goes below the content
    <hr>
     <small>Copyright 2008 My Site</small><br>
    1.  </body> </html>
      3)Finally you need to create the content pages for your site. In this file you will:
      full script:
       <?php include 'header.php'; ?>
      1. <b>Sub-Page Title</b><p> Here is the specific content of this page....<br> <?php include 'footer.php'; ?>
      Note:
       Remember to save all your files with the .php extension.
       
That’s all… follow this kind of template while developing web sites ..

keyup function in Jquery


This post shows u that how to use keyup () in jquery.

Let’s us take username and password example.

Consider . the username length should > 4, also password length should > 6.

while we give the value for username that < 4, it shows the error message “username is too short“, then we give correct length value, automatically the error message will be disappear..

same for password field..

Coding:

<script type = “text/javascript” src=”jquery.js”> </script>
<script>
$(document).ready(function(){
$(“#txt_username”).keyup(function()
{
$(“#username_warning”).html(“”);
if ($(“#txt_username”).val().length < 4) {
$(“#username_warning”).html(“Username is too short”);
}
});

$(“#txt_password”).keyup(function()
{

$(“#password_warning”).html(“”);

if ($(“#txt_password”).val().length < 6) {
$(“#password_warning”).html(“Password is too short”); }
});
});
</script>
<body>
<b>Username:</b>
<i>Username must be at least 4 characters in length</i>
<input type=”text” id=”txt_username” name=”username”> <br><br>
<span id=”username_warning” style=”color:red”></span> <br><br>
<b>Password:</b>
<i>Password must be at least 6 characters in length</i><br>
<input type=”password” id=”txt_password” name=”password”>
<span id=”password_warning” style=”color:red”></span>
</body>


Output:


Simple Sign in Pop up using jquery


Hi,

This is another fantastic concept using jquery.

This is done by toggle() in jquery. we can also the function as our desire.

Coding:

<script type=”text/javascript” src=”http://ajax.googleapis.com/ajax/libs/jquery/1.3.0/jquery.min.js”></script&gt;
<script type = “text/javascript”>
$(document).ready(function()
{
$(“.sign”).click(function()
{
$(“#sign_box”).toggle();
//return false;
});
});
</script>
</head>
<body>

<div> <a href = “#” class = “sign”> Sign In </a> </div>
<div id = “sign_box”>
<form method=”post” action=””>
<label>UserName
<input type=”text” name=”usr”/></label>
<label>Password
<input type=’password’ name=”pwd”/></label>
<input type=”submit” value=” Sing In “/>
</form>
</div>

</body>

Desing Ur Html/css code as ur wish.

Output:

(when you click the singin link it shows the following output)


Give colors to table cells


Hi,

This is very basic exapmle for css usage..

Let’s look,

create a db and table for display the values in table format.

Coding:

<?php

mysql_connect(“localhost”, “root”, “Iroot054”)or die(“cannot connect”);
mysql_select_db(“mani_color”)or die(“cannot select DB”);

$sql=”SELECT * FROM color”;
$result=mysql_query($sql);

// Define $color=1
$color=”1″;

echo ‘<table width=”400″ border=”1″ align=”center” cellpadding=”2″ cellspacing=”0″>’;
while($rows=mysql_fetch_array($result))
{

// If $color==1 table row color = #FFC600
if($color==1)
{
echo “<tr bgcolor=’#FFC600′>
<td>”.$rows[‘id’].”</td><td>”.$rows[‘firstname’].”</td><td>”.$rows[‘lastname’].”</td>
</tr>”;
// Set $color==2, for switching to other color
$color=”2″;
}

// When $color not equal 1, use this table row color
else
{
echo “<tr bgcolor=’#C6FF00′>
<td>”.$rows[‘id’].”</td><td>”.$rows[‘firstname’].”</td><td>”.$rows[‘lastname’].”</td>
</tr>”;
// Set $color back to 1
$color=”1″;
}

}
echo ‘</table>’;
mysql_close();
?>

Output:


Simple Calender Using jquery


Here is the fantastic jquery code for simple calender.

This is used for entering the date values for many purposes such as dob,expiry date.

when we will click the textbox, it shows the datepicker to select the date values.

we need two jquery calender js library files

jquery.1.4.2.js, jsDatePick.jquery.min.1.3.js,  jsDatePick_ltr.min.css

Coding:

<html>
<head>

<title>Javascript example</title>

<link rel=”stylesheet” type=”text/css” media=”all” href=”jsDatePick_ltr.min.css” />

<script type=”text/javascript” src=”jquery.1.4.2.js”></script>
<script type=”text/javascript” src=”jsDatePick.jquery.min.1.3.js”></script>

<script type=”text/javascript”>
window.onload = function(){
new JsDatePick({
useMode:2,
target:”inputField”,
dateFormat:”%d-%M-%Y”
});
};
</script>
</head>
<body>
<input type=”text” size=”12″ id=”inputField” />
</body>
</html>


Output:

Zoom the value using jquery..


Another Interesting Concept using jquery..

this is very simple one. Let’s start.

To do this, we need jquery library file

we can add it in two ways

Recommended version: just refer direct link from library site

ex: <script type=”text/javascript” src=”http://ajax.googleapis.com/ajax/libs/jquery/1.3.0/jquery.min.js”></script&gt;

Downloaded Version: download the library file and put it into ur folder

ex: /zoom(folder name)/jquery.js

/zoom(folder name)/zoom.html

First list out the values in select box.. Give one id to select box to get values for zooming.

Coding:(zoom.html)

<html>
<head>
<script type=”text/javascript” src=”http://ajax.googleapis.com/ajax/libs/jquery/1.3.0/jquery.min.js”></script&gt;
<script type=”text/javascript”>
$(document).ready(function()
{
$(“#zoom”).change(function()
{
var size = $(this).val();
$(“#main”).css(‘font-size’, size + ‘px’);
return false;
});
});
</script>
</head>
<body>
<select id = “zoom”>
<option value=”25″>2 </option>
<option value=”50″>4 </option>
<option value=”75″>6 </option>
<option value=”100″>8 </option>
<option value=”150″>10 </option>
<ption value=”200″>12 </option>
</select>
<div id=”main”>
Zoom Effects using Jquery and css.
</div>
</body>
</html>


That’s all. Check Ur output..

Thankz ..

Screenshot:


Sum Text Box Values Using jquery


I hope all that  This post will very interesting one ..

Sum Text Box Values Using jquery.

when You give the inputs into the textbox, the values will be added for each values.

Coding:

<script src=”https://ajax.googleapis.com/ajax/libs/jquery/1.7.1/jquery.min.js”></script&gt;
<script>
$(document).ready(function(){

//iterate through each textboxes and add keyup
//handler to trigger sum event
$(“.txt”).each(function() {

$(this).keyup(function(){
calculateSum();
});
});

});

function calculateSum() {

var sum = 0;
//iterate through each textboxes and add the values
$(“.txt”).each(function() {

//add only if the value is number
if(!isNaN(this.value) && this.value.length!=0) {
sum += parseFloat(this.value);
}

});
//.toFixed() method will roundoff the final sum to 2 decimal places
$(“#sum”).html(sum.toFixed(2));
}
</script>.

Design Ur css/html code as ur desire.. Just i attached my output screenshot for your clarification.


pdf generation in php


Hi,

this post teaches u how to generate pdf using php scripts.. It’s very easy

Let’s start.

First we should download fpdf files such as(fpdf.php, font foleder)

then, create a simple php script file look like the following


<?php
require(‘fpdf.php’);
$PDF = new FPDF();

$PDF->AddPage();
$PDF->SetFont(‘Arial’, ‘B’, 16);
$PDF->Cell(40, 10000, ‘Hello World!’);

$PDF->Output();
?>


In above scripts, some most used functions are used. such as addpage(), font() etc..

run your script to see the output.

Thankz!

Set Up a Faculty and Staff Profiles Page in Drupal(continued)


Creating a Profile List with Views

Now comes the fun part: making it possible to see a listing of all your faculty/staff members’ user profiles.  To do this, we’ll use the Drupal Views module.

Initial Setup

  1. In the menu at the top of the screen, choose “Site building > Views > Add”.
  2. Under “View name”, enter a machine-readable name for your view; e.g., “fsprofiles”.
  3. Under “View description”, enter a human-readable name for your view; e.g., “Faculty/Staff Profiles”.
  4. Important: under “View type”, choose “User”. (You cannot change this setting later, so please double-check it before continuing.)
  5. Click “Next” to continue.

Showing the Right Users

In order to limit this view to just faculty/staff users, we’ll need to set up a Filter.

  1. Click the “+” sign in the “Filters” block.
  2. In the form that appears just below the main interface, click the checkbox next to “User: Roles”; then, click the “Add” button.
  3. Under “Options”, select “untfs”; this is the UNT faculty/staff role enabled by default in all of our Drupal installations.  Then, click the “Update” button.

Fields

In Drupal Views, “fields” are the individual pieces of information that show up for each displayed record.  In our case, we’ll want to show the user name (linked to his or her full profile), picture, and biography.

  1. Click the “+” sign in the “Fields” block.
  2. In the form that appears just below the main interface, click the checkboxes next to each field you’d like to include.  In our example, we want “Profile: Biography”, “User: Name” and “User: Picture”.
  3. Drupal will walk you through several settings pages, one for each of the fields you selected.  Generally, the default settings are fine, although you may want to blank out the “Label” field each time, since labels shouldn’t be necessary in the view we’re building.  Also, for the “Biography” field, it’s a good idea to check “Trim this field to a maximum length” and enter in a maximum length of, say, 140 characters.  Otherwise your listing page could become a bit too lengthy.
  4. When you’re finished setting up each field, go back up to the “Fields” block and click the up/down arrow button.  This will allow you to rearrange the order of the fields you created as necessary.

Preferences

There are a few additional settings worth playing with to get your listing to look the way it ought to.

  1. In the “Basic settings” block, click the “Unformatted” link next to “Style”.
  2. In the form that appears just below the main interface, choose from among the available options; if you’re not using a biography field, “Grid” is an excellent choice, but otherwise you’re probably safest to stick with “Table”.
  3. Back up in the “Basic settings” block, click the “None” link next to “Title”.
  4. In the form that appears just below the main interface, enter a title for your view; e.g., “Faculty/Staff Profiles”.  This will appear as a heading when you access the view.
  5. Back up in the “Basic settings” block, click the “No” link next to “Use pager”.
  6. Check “Full pager” and click “Update”; this will ensure that your profile listing has proper pagination links.

Setting up a Display

In order to make your new view accessible to your users, you’ll need to create a page display for it.

  1. In the left-most column of the main interface, select “Page” and click “Add display”.
  2. In the new “Page settings” block, click the “None” link next to “Path”.
  3. In the form that appears just below the main interface, enter in a relative path for this view; e.g., “faculty-and-staff”; then, click “Update”.
  4. Click “Save” to finalize your new view.

Adding a Link

Your new view is set up and ready to use, but you’ll need to create a link in the menu system before your users will be able to find it.

  1. In the menu at the top of the screen, choose “Site building > Menus”.
  2. Click the link for the menu in which you’d like the new link to appear.
  3. Click the “Add item” tab.
  4. Under “Path”, enter the path you assigned to the view earlier (e.g., “faculty-and-staff”).
  5. Under “Menu link title”, enter some descriptive text (e.g., “Faculty and Staff Profiles”).
  6. Click “Save” to finish adding your new menu item.

And that’s it!  You now have a working faculty/staff profile listing which users can access to find out more about the people that make up your organization..

Thankz.

Set Up a Faculty and Staff Profiles Page in Drupal


Putting a human face on your web content can really help you engage your users; fortunately, Drupal provides some simple tools that allow you to do this easily.  In this tutorial, we’ll set up a simple list of faculty/staff profiles, including names, pictures, and biographies.

To do this, we’ll use a combination of the Drupal Views module and the Drupal core profile system.

Enabling User Pictures

The Drupal core profile system allows your users to assign themselves pictures to display on their profile pages; however, this functionality is not enabled by default.  To enable it…

  1. In the menu at the top of the screen, choose “User management > User settings”.
  2. Scroll down to the “Pictures” section; under “Picture support”, choose “Enabled”.
  3. Click “Save configuration”.

Your users can now upload their own profile pictures as follows:

  1. Log in to the site.
  2. Click “My Account”.
  3. Click the “Edit” tab.
  4. In the “Picture” section, choose a picture to upload.
  5. Click “Save” at the bottom of the page.

Adding Custom Profile Fields

The Drupal core profile system also allows you to specify custom fields for your users to fill out; in our example, we’ll allow them to write themselves a short biography describing what they do for our organization.

  1. In the menu at the top of the screen, choose “User management > Profiles”.
  2. The list under the heading “Add new field” shows you the various types of fields you can specify; in this case, click on “multi-line textfield”.
  3. Under “Category”, enter something along the lines of “Personal Information”.
  4. Under “Title”, enter the name of the field; in this case, “Biography”.
  5. Under “Form name”, give the field a machine-readable name such as “profile_biography”.
  6. Under “Explanation”, you can enter some text describing what kind of information you’re looking for.  This is a great place to inform your users about your site’s style guidelines (for instance, “always write in third person” or “provide a bulleted list of your responsibilities”).
  7. The rest of the default settings should be fine for now, so scroll to the bottom of the page and click “Save field”.

To test out the new field, you can visit the “My Account” page; click the “Edit” tab, and then click the “Personal Information” tab.  You should now have a “Biography” text area to fill out…

Collect User Feedback with a Drupal Poll


The Drupal core poll module provides all the functionality you’ll need to start collecting that information.  In this tutorial, we’ll set up a quick poll asking users about their interests in particular subjects.

  1. The poll module is installed but not enabled by default in Drupal sites.  Before you can build a poll, you’ll need to enable it from the “Site building > Modules” page.
  2. screenshotIn the menu at the top of the screen, choose “Content management > Create content > Poll”.
  3. screenshotEnter your poll question into the “Question” box at the top of the page.  In our example,we will be asking “Which of these subjects interests you the most?”
  4. screenshotNext, enter in the possible answer choices.  If you need more than the default two options, just click the “Add another choice” button.  Also, feel free to ignore the “Vote count” column.  In our example, we used two options: “Surviving underwater” and “Weaving baskets”.
  5. screenshotUnder “Poll settings,” you can make a variety of configuration changes based on your needs; for instance, if you only want this poll to run for 1 week and then close, you can select “1 week” for “Poll duration”.
  6. screenshotNote under “Publishing options” that your poll will be automatically promoted to the front page of your site by default; if you’d prefer otherwise, feel free to change the setting.
  7. screenshotClick “Save” to publish your poll!

If you frequently publish new polls on your site, it might be worth adding the “Most recent poll” block to one of your sidebars so that users can access your new poll as easily as possible.  To do this:

  1. In the menu at the top of the screen, choose “Site building > Blocks”.
  2. Scroll down to the “Disabled” section and find the “Most recent poll” block.
  3. Use your mouse to drag the block up into one of the sidebar sections.
  4. Click “Save blocks”.

Now, your poll will appear to your users on every page, making it very easy for them to fill out.

Turn your photo album into a dynamic slideshow block with Views Rotator(continued)


Displaying the block

Now that you’ve created your rotating block, you need to assign it to a region so it will be visible to your users. Here’s how:

  1. screenshot Go to “Site building > Blocks”.
  2. screenshot Assign the “Galleries: Block” block into an appropriate region.
  3. screenshot Then, click “Save configuration” at the bottom of the screen.


Now we are done.. Check it your Slide show views

Thankzz.

Turn your photo album into a dynamic slideshow block with Views Rotator


Hi to All,

 This part is continue from last article that is Creating a Photo gallery, this is slight advance to make our photo gallery into dynamic slideshow view.

Here’s how to get it set up.

First thing,  we have to install  views_rotator module(sites/modules/viewes_rotator) and enable it(admin/modules)..

then we can start to configure the rotator.

Configuring the rotator

  1.  Go to the page where you edit your view; you can get there by hovering over the top of your view and clicking the “Edit” link that shows up; otherwise, you can also use the “Site building > Views” menu option.
  2. screenshot In the leftmost column, select “Block” and click “Add display”.
  3. screenshot In the “Basic settings” block, click the link next to “Style”.
  4. screenshot In the form that appears below the main interface, click the “Override” button.
  5. screenshot Then, in that same form, select “Views Rotator” and click “Update”.
  6. screenshot Configure the timing settings as you like and click “Update”.
  7. screenshot Back up in the main interface, click on the header of the “Arguments” block.
  8. screenshot In the form that appears below the main interface, click the “Override” button; then, click “Update”.
  9. screenshot Back up in the main interface, click on “Taxonomy term” in the “Arguments” block.
  10. screenshot In the form that appears below the main interface, adjust the value for “Action to take if argument is not present”. It’s a good idea to choose either “Display all values” or “Provide default argument”; that way, your block will always have something to display.
  11. screenshot Click the “Update” button.
  12. screenshot Click “Save” to finish modifying your view.


Stay tuned for Continue postings….


Create a Photo Gallery in Drupal(Continued)


Creating a Gallery View(Continued)

 4) Telling Drupal How to Display It

Per the stated requirements, we’re going to want to set up a simple grid displaying each photo’s thumbnail; here are the settings:

  1. screenshotIn the “Basic settings” block, click the “Unformatted” link next to “Style”.
  2. screenshotIn the form that appears just below the main interface, choose “Grid”; then, click “Update”.
  3. On the next page, you can make a few modifications to the default grid settings if you wish; when you’re finished, click “Update” once more.

You may also want to configure the number of items displayed on each page of your View by modifying the “Items to display” and “Use pager” settings; the latter is especially important if you expect your galleries to contain more items than you configure the view to display.

Telling Drupal Where to Display It

We’re almost done; all that’s left is to assign our new View a page display and give it a URL.

  1. screenshotIn the leftmost column of the Views interface, select “Page” and click “Add display”.
  2. screenshotIn the “Page settings” block, click the “None” link next to “Path”.
  3. screenshotIn the form that appears just below the main interface, enter the URL path where your galleries should live; for example, “galleries”.  Click “Update” to finish setting up your path.
  4. screenshotIn the “Page settings” block, click the “No menu” link next to “Menu”.
  5. screenshotIn the form that appears just below the main interface, you can set up a menu item for this view.  Check “Normal entry” and enter “Galleries” in the “Title” field; configure the remaining fields just as you would any other Drupal menu item.
  6. Click “Save” to finish setting up your View..

We are Done upto this part… now see ur photo gallery…

Thanxz..

Create a Photo Gallery in Drupal(Continued)


Creating a Gallery View(Continued)


3) Limiting the View to a Single Gallery

So far we’ve filtered our View down to display just Photo nodes; that’s a good start, but what we really want is to display just Photo nodes from within a single gallery.  We could set this up as another filter, but that wouldn’t give each gallery its own URL; instead, we’re going to set up a URL argument.

  1. screenshotClick the “+” sign in the “Arguments” block.
  2. screenshotIn the form that appears just below the main interface, check “Taxonomy: Term”; then, click “Add”.
  3. screenshotOn the next page, enter “%1” for “Title”; this will cause Drupal to use the name of the gallery as the title of the view.
  4. screenshotUnder “Action to take if argument is not present”, check “Summary, sorted ascending”.
  5. screenshotUnder “Validator”, choose “Taxonomy term”.
  6. screenshotUnder “Vocabularies”, choose “Galleries”.
  7. screenshotUnder “Argument type”, choose “Term name or synonym”.
  8. screenshotClick “Update” to finish creating your argument.  You may need to click “Update” several more times to accept the default settings for the View summary.

Telling Drupal What to Display

Now that we’ve got the content selection process taken care of, we’ll need to tell Drupal how each Photo node ought to be displayed in the View.  All we’re really interested in here is the thumbnail image, so we’ll just set up a single field for that:

  1. screenshotClick the “+” sign in the “Fields” block. (nb: if there is nothing to click, make sure that ‘Row Style’ is set to ‘Field’ in the Basic Settings section)
  2. screenshotIn the form that appears just below the main interface, check “Content: Photo (field_photo)”.
  3. screenshotOn the next page, check “Link this field to its node”.
  4. screenshotUnder “Label”, select “None”.
  5. screenshotUnder “Format”, choose “thumbnail image linked to node”.
  6. screenshotClick “Update” to finish creating your field.


Create a Photo Gallery in Drupal(Continued)


Creating a Gallery View(Continued)

2) 

Filtering for Photos

By default, a new node-based View will show all content nodes on your site, regardless of type.  To fine-tune this, we’ll set up a filter so that only Photo nodes are displayed:

  1. screenshotClick the “+” sign in the “Filters” block.
  2. screenshotIn the form that appears just below the main interface, check “Node: Type”; then, click “Add”.
  3. screenshotOn the next page, make sure that “Operator” is set to “Is one of”, and check “Photo” under “Node type”; then, click “Update”.

There are a couple of additional filters worth setting up, one for ensuring that the photos displayed have a gallery term, and the other for ensuring that the photos displayed have been officially published.

  1. screenshotClick the “+” sign in the “Filters” block.
  2. screenshotIn the form that appears just below the main interface, check “Taxonomy: Vocabulary”; then, click “Add”.
  3. screenshotMake sure that “Operator” is set to “Is one of”, and check “Galleries” under “Options”; then, click “Update”.
  4. screenshotClick the “+” sign in the “Filters” block once more.
  5. screenshotIn the form that appears just below the main interface, check “Node: Published”; then, click “Add”.
  6. screenshotChoose “Yes”; then, click “Update”.


Create a Photo Gallery in Drupal(Continued)


Creating a Gallery View

Once you’ve got your basic content type set up, it’s time to tell Drupal how to generate each photo gallery.  To do this, we’ll set up a Drupal View that collects all the photo nodes in a particular gallery and displays them in a clean, organized grid.

1) Initial Setup

  1. screenshotIn the menu at the top of the screen, choose “Site building > Views > Add”.
  2. screenshotUnder “View name”, enter “gallery”.
  3. screenshotUnder “View description”, enter “Gallery”.
  4. screenshotUnder “View type”, choose “Node”.
  5. screenshotClick “Next”.


Create a Photo Gallery in Drupal(Continued)


Uploading your First Photo

Now that the content type is set up, you might want to give it a spin to see how the upload form works.  As it turns out, uploading a photo is now as easy as creating any other Drupal node:

  1. screenshotIn the menu at the top of the screen, choose “Content management > Create content > Photo”.
  2. screenshotFill out the form as usual, providing a title and (optionally) a description.
  3. screenshotYou should also see your image upload field somewhere in the form; if you didn’t change the order of the fields in your content type, it should show up just below the body field.  Upload your image by browsing to it on your computer and clicking the “Upload” button.
  4. screenshotClick “Save” to submit your new photo node.

You may want to upload a few more photos before continuing on with the tutorial; it’ll be easier to set up the gallery view if you’ve got some live content to work with.

Stay tuned for next post..

Create a Photo Gallery in Drupal(Continued)


Generating Thumbnails and Preview Images


  1. In the menu at the top of the screen, choose “Site building > ImageCache”.
  2. First, we’ll create the thumbnail preset.  Thumbnails, in our example, will need to be scaled and cropped down to fit in a 120×120 pixel square; this will make it really easy to set up our gallery view later on.
    1. screenshotClick “Add new preset”.
    2. screenshotUnder “Preset namespace”, enter “thumbnail”; then, click “Create New Preset”.
    3. screenshotUnder “Actions”, click “Add Scale and Crop”.
    4. screenshotEnter “120” for both “Width” and “Height”; then, click “Add Action”.
  3. Next, we’ll create the preview preset.  We’ll use this preset when the photo is viewed on its own page, so really the main constraint is that it should be no wider than we expect the browser to be.  400 pixels is a good rule here.
    1. screenshotFrom the “Site building > ImageCache” page, click “Add new preset”.
    2. screenshotUnder “Preset namespace”, enter “preview”; then, click “Create New Preset”.
    3. screenshotIn this case we only need scaling, not cropping; so click “Add Scale”.
    4. screenshotUnder “Width”, enter “400”.
    5. screenshotEmpty out the “Height” field; we want ImageCache to generate the image’s height automatically so that the image’s aspect ratio remains consistent.
    6. screenshotClick “Add Action”.
  4. screenshotNow that the appropriate image manipulation presets are set up, we need to tell Drupal to use them as appropriate in our Photo content type.  In the menu at the top of the screen, choose “Content management > Content types > Edit Photo > Display fields”.
  5. screenshotUnder “Teaser”, choose “thumbnail image linked to node”.  This will cause Drupal to use the thumbnail preset whenever your image node is displayed in the shortened “teaser” mode.
  6. screenshotUnder “Full node”, choose “preview image linked to image”.  This will cause Drupal to display the preview image when your image node is viewed by itself, and allow the user to click to see the full, unmodified image.
  7. screenshotClick “Save”.


Create a Photo Gallery in Drupal(Continued)


Organizing your Photos


Photo sharing sites typically allow photos to be organized via at least two different facets: galleries and free tagging. We’ll set up both of these facets using Drupal’s built-in taxonomy module.

  1. screenshotIn the menu at the top of the screen, choose “Content management > Taxonomy”.
  2. First, we’ll set up gallery categorization.
    1. screenshotClick “Add vocabulary”; vocabularies in Drupal taxonomy are simply collections of related words describing a particular content facet.
    2. screenshotUnder “Vocabulary name”, enter “Galleries”.
    3. screenshotUnder “Content types”, check “Photo”.
    4. screenshotUnder “Settings”, check “Required”; this will force every photo to be placed into a gallery when it is created.
    5. screenshotClick “Save”.
  3. To add a new album, you’ll need to add a new taxonomy term to the vocabulary:
    1. screenshotClick “list terms” next to Galleries in the list of vocabularies.
    2. screenshotClick “Add term”.
    3. screenshotEnter the name of your gallery in the “Term name” field.
    4. screenshotClick “Save”.
  4. Next, we’ll set up free tagging. . If you haven’t set up free tagging yet, here are the steps:
    1. Click “Add vocabulary”.
    2. Under “Vocabulary name”, enter “Tags”.
    3. Under “Content types”, check every type of content you’d like to be able to tag.
    4. Under “Settings”, check “Tags” and “Multiple select”.
    5. Click “Save”.

Create a Photo Gallery in Drupal


In this tutorial, we’re going to walk you through the process of setting up a photo gallery system in Drupal; in the process, we’re going to take  Drupal CCK and Views modules.

First, this tutorial consists with the following parts

1)

Creating the Photo Content Type

2)

Organizing your Photos

3)

Generating Thumbnails and Preview Images

4)

Uploading your First Photo

5)

Creating a Gallery View


Creating the Photo Content Type

First, you’re going to need to set up a special content type allowing photo uploads.

  1. Create a new content type called “Photo”.
  2. screenshotThen, find your way to its “Manage fields” page.
  3. screenshotUnder “New field”, fill in the appropriate values to create a new field called “Photo”.  For “Type”, select “File”; for “Element”, select “Image”.  Click “Save” to continue.
  4. screenshotOn the following page, you can fine-tune the required characteristics of uploaded images; for instance, you can set minimum/maximum resolutions, filename extensions, and so on.
  5. screenshotUnder “Path settings”, enter “photos” to help keep your uploaded files organized.
  6. screenshotUnder “ALT text settings”, you can set up rules governing the text that will be displayed if your uploaded image cannot be viewed.  This is extremely important for accessibility compliance; at minimum, you should check the “Enable custom alternate text” box, and also enter a sensible default for “Default ALT text”: for example, “Photo contributed by [user-name].”
  7. screenshotUnder “Global settings”, check the “Required” box to make sure that every Photo node has an uploaded photo.
  8. screenshotClick “Save field settings” to continue.

Stay tuned for  upcoming posts.. Thanx

Expand-collapse toggle panel (div) using jquery


Hi,

In this post, I’ll show you how easy it is to show expandable and collapsible toggle panel using jQuery. When you click on the heading, the content gets displayed by sliding and when you again click on the heading again, it gets collapsed.

Coding:

<html>
<head>
<title>Expandable panel Using jQuery</title>
<script type=”text/javascript” src=”jquery.js”></script>
<script type=”text/javascript”>
$(document).ready(function()
{

//hide the all of the element with class msg_body

$(".msg_body").hide();

$(“.msg_head”).click(function()
{

 //toggle the componenet with class msg_body

$(this).next(“.msg_body”).slideToggle(300);
});
});
</script>

<style>
.msg_head
{
background-color :#FFCCCC;
}

.msg_body
{
padding: 5px;
background-color :#32e68f;
}
</style>

</head>
<body>

<div id=”firstpane”>

<p class =”msg_head”>Header-1</p>
<div class =”msg_body”>
As you can see above, the whole message panes contained inside the div with class name “msg_list”. And, the header element where you click is defined with the class “msg_head” and after that there is element with class “msg_body” which contains the message or text which is expandable or collapsible.
</div>

<p class =”msg_head”>Header-2</p>
<div class =”msg_body”>
As you can see above, the whole message panes contained inside the div with class name “msg_list”. And, the header element where you click is defined with the class “msg_head” and after that there is element with class “msg_body” which contains the message or text which is expandable or collapsible.
</div>

<p class =”msg_head”>Header-3</p>
<div class =”msg_body”>
As you can see above, the whole message panes contained inside the div with class name “msg_list”. And, the header element where you click is defined with the class “msg_head” and after that there is element with class “msg_body” which contains the message or text which is expandable or collapsible.
</div>

</div>

</body>
</html>

Check output.. It’s interesting one


Drupal 7 Setup DownloadFile Module


Drupal 7

Dependency

  • DownloadFile 7.x depends on the File core module.

Installation

  1. Copy the download_file folder to the modules folder in your installation.
  2. Enable the module using Administration -> Modules (/admin/modules).
  3. Configure user permissions in Administration -> People, click on the Permissions tab (admin/people/permissions), go to DownloadFile module part and “Access direct download file”.
  4. Manage teaser and full node display settings at Administration -> Structure -> Content types -> “your type” -> manage display (admin/structure/types/manage/”your type”/display).
  5. Choose a formatter to apply to files or images in that field. Four new formatters “Direct download file” appear in the select list.
  6. Configure the format of the link accessible at Administration -> Configuration -> Media -> Download file (/admin/config/media/download-file).

Using with Views module

Similarly, you can use a formatter when displaying files or images attached to nodes using File or Image in a View through the Views UI.

  1. Manage display at Administration -> Structure -> Views (/admin/structure/views) and add a new view by clicking the “Add new view” link (/admin/structure/views/add) or edit an existing view by clicking the “Edit” link (/admin/structure/views/edit/”your view”).
  2. Click on a file field or image field.
  3. Choose a formatter in select list “Format” to apply at this field. Four new formatters “Direct download file” appear.
  4. Click on “Save” button and see the display in the preview.

Drupal 6- Setup DownloadFile Module


DownloadFile:

DownloadFile is a module to direct download files or images.

ScreenShot:

Screenshot of this module display

Dependency

  • DownloadFile 6.x depends on the CCK and FileField modules.

Installation

  1. Copy the download_file folder to the modules folder in your installation.
  2. Enable the module using Administer -> Site building -> Modules (/admin/build/modules).
  3. Configure user permissions in Administer -> User management -> Permissions -> download_file module and “access direct download file”.
  4. Manage teaser and full node display settings at Administer -> Content -> Content types -> “your type” -> Manage fields (/admin/content/node-type/”your type”/fields) and click on the Display fields tab (/admin/content/node-type/”your type”/display).
  5. Choose a formatter to apply to files or images in that field. Four new formatters “Direct download file” appear in the select list.
  6. Configure the format of the link accessible at Administer -> Site configuration -> Download file (/admin/settings/download-file).

Using with Views module

Similarly, you can use a formatter when displaying files or images attached to nodes usingFileField or ImageField in a View through the Views UI.

  1. Manage display at Administer -> Site building -> Views (/admin/build/views) and add a new view by clicking the “Add new view” tab (/admin/build/views/add) or edit an existing view by clicking the “Edit” link (/admin/build/views/edit/”your view”).
  2. Click on a file field or image field.
  3. Choose a formatter in select list “Format” to apply at this field. Four new formatters “Direct download file” appear.
  4. Click on “Save” button and see the display in the preview.

Insert View Module Preview


What is the Insert View module?

The Insert View module is a Drupal module that allows site developers to insert a view inside a node using a simple tag

What features does the Insert View module offer?

The Insert View module supports many nice features including:

  1. The ability to insert a view inside a node with a simple tag such as [view: viewname]
  2. The ability to pass arguments to the view with a syntax like [view: viewname==arg1]
  3. The ability to limit the number of enteries returned by the view using a syntax like [view: viewname=x] where x is the number of entries
  4. The ability to choose a certain view display with a syntax like [view: viewname=displayname]
  5. The ability to include itself in any place (not just nodes) that accepts Input Formats, which gives the capabilities to insert views in any part of the drupal site that accepts standard Input Formats

Steps to Install and Configure the Insert View module:

  1. Download the module from http://drupal.org/project/insert_view
  2. Also download the view module from http://drupal.org/project/views
  3. Extract the 2 modules and copy their directories to the sites/all/modules directory on your site
  4. Enable the Insert View, Views and Views UI modules
  1. Enable the Insert View module
  2. You then need to configure the Input Format that you will use to insert views, navigate to yourdomain.com/admin/settings/filtersConfigure the input formats to use insert views
  3. Click the configure link near the input format you will use to insert your views, and select the insert views filterSelect the insert views filter in the input format
  4. You then need to figure out the name of the view you want to insert, navigate to yourdomain.com/admin/build/views and copy the view nameCopy the view name you want to insert
  5. Add or edit the node you want to add the view to, then select the Input format that you configured for the insert views filterSelect the proper input format for insert view
  6. Add the Insert View tag where u want it at the node body in the form of [view: viewname] and paste the viewname you copied beforeInsert the view into the node body
  7. After you save the node you can see that the view content is rendered in the place of the Insert View tagThe view is rendered in place if the insert view tag

As you can see the Insert View module comes very handy when u need to add a view anywhere you can use Input Formats..

Admin Role Module Preview


What is the Admin Role module?

The admin role module is a Drupal module that creates a super admin role that can be assigned to any number of users, giving the Drupal site multiple super admins instead of only one

What features does the Admin Role module offer?

The admin role module provides some very nice features including:

  1. Automatically create a administrator role that has all the permissions for the Drupal site
  2. Automatically assigns new permissions to the role when new modules are added to the site
  3. The ability to enable or disable the administrator role
  4. The ability to treat the administrator role like a regular Drupal role, thus opening the possibility to great features to come

Steps to install and configure the admin role module:

  1. Download the module from http://drupal.org/project/adminrole
  2. Extract and copy the module directory to the sites/all/modules directory on your site
  3. Enable the moduleEnable the admin role module
  4. Navigate to yourdomain.com/admin/user/settings and make sure that the administrator setting is not DisabledEnable the administrator role configuration
  5. If you navigate to yourdomain.com/admin/user/roles you can see that a new administrator role was added by the modulea new administrator role was added by the admin role module
  6. If you navigate to yourdomain.com/admin/user/permissions you can see that the administrator role was given all permissions by defaultThe administrator role was given all permissions
  7. When you add a new user to your site from yourdomain.com/admin/user/user/create you can assign the administrator role to it just like any other regular Drupal roleAssign administrator role to new user

As you can see the admin role module is very useful and has a lot of nice features..


Translate your Drupal Site into Multiple Languages


Hi,

Before you get started, you’ll need to make sure that the “Locale” and “Content translation” modules are enabled on your site. You can enable them for yourself by visiting the “Site building > Modules” page; alternatively, just let us know and we’ll be happy to enable them for you.

Adding language support

Next, you’ll need to tell Drupal which languages are supported by your site.

  1. In the menu at the top of the screen, choose “Site configuration > Languages”.
  2. Click the “Add language” tab.
  3. Under “Language name”, select the language you’d like to add, and click the “Add language” button.

Enabling translation by content type

Content translation in Drupal is only enabled for the content types you specify; in this example, we’ll allow translation of “Page” posts.

  1. In the menu at the top of the screen, choose “Content management > Content types > Edit Page”.
  2. Under “Workflow settings”, change “Multilingual support” to “Enabled, with translation”.
  3. Click “Save content type”.

Translating your content

Now that everything is configured, take a look at the “Content management > Content > List” page. You should now see a column entitled “Language”; at this point, everything in that column will be marked “Language neutral”. “Language neutral” content cannot be translated as-is, so if you’d like to provide a translation of one of these pages, you’ll need to do the following:

  1. Edit it; from the content list, you can do this by clicking the “edit” link.
  2. Under “Language”, choose the language in which this page is currently written.
  3. Click “Save”.

Now that Drupal knows what language the original content is in, it’s time to provide a translated version.

  1. View the page; from the content list, you can do this by clicking on its title.
  2. Click the “Translate” tab. If you do not see a “Translate” tab, check the following:
    • Make sure you have enabled multilingual support for this post’s content type.
    • Make sure that the original post’s language is not set to “Language neutral”.
    • Check the “User management > Permissions” and “User management > Users” pages to make sure that you are in a role that has the “translate content” permission.
  3. Find the language into which you’d like to translate the content and click its “add translation” link.
  4. Enter your translation in the form that appears, making sure to click “Save” when you’re done.

Once you’ve added your translation, your visitors will be able to access it by clicking on their preferred language in the list at the bottom of the page. Users can also set a language preference by visiting the “My Account” page.


Receive email notifications about new content with Drupal rules


  1. The rules module is not installed by default in the  Drupal distribution, so we need to install it
  2. Log in to your Drupal site.
  3. In the menu at the top of the screen, choose “Rules > Triggered rules > Add a new rule.” (If this does not appear, please contact CWS; we will need to enable an additional module.)
  4. In the “Label” field, enter “Notify admin of new Story.”
  5. In the “Event” field, choose “After saving new content;” click “Save changes” to continue.
  6. On the next screen, click the “Add a condition” link.
  7. In the “Select the condition to add” field, choose “Content has type;” click “Next” to continue.
  8. Optionally, change the “Label” on the next screen to “Content is a Story”. This will help you keep track of what this condition does later on.
  9. Under “Content types”, choose “Story;” click “Save” to continue.
  10. You should be back at the rule editor screen; click the “Add an action” link.
  11. In the “Select an action to add” field, choose “Send a mail to an arbitrary mail address;” click “Next” to continue.
  12. Optionally, change the “Label” on the next screen to include the email address; again, this is just to help you keep track of what the action does.
  13. In the “Recipient” field, enter the email address to which you’d like these notifications to be sent.
  14. Fill out the “Subject” and “Message” fields as required. As you’re doing this, you can use the special tokens listed in the “Token replacement patterns” section to substitute in values from the newly-created content. For instance, if you wanted the Subject to include the title of the new story node, your subject field could be: “New Story: [node:title]”.
  15. Click “Save” when you’re finished.

At this point, you can test out your new rule by creating a new Story node; if everything’s set up correctly, the configured email address should receive the notification email.


Control which content appears on the front page in Drupal


It is very simple to control what content is displayed on the front page of your Drupal site, and how it looks. In this tutorial, we’ll cover some of the most common possibilities.

Controlling whether a specific post is displayed on the front page

If you would like to display a specific post on the front page, edit it, and under the ‘Publishing options’ section, simply check the box next to ‘Promoted to front page’.

Controlling whether posts of a content type are displayed on the front page by default

To do this, go to “Content Management > Content Types”, and edit the content type you wish to change. Under ‘Workflow Settings’, check or uncheck the box next to ‘Promoted to front page’ as appropriate.

Controlling the Front Page settings

To do this, go to “Content Management > Post Settings”. You will then see options for how many posts to display on the front page, and the length of trimmed posts on the front page. (It’s possible to set the length to ‘unlimited’ to show complete posts on the front page.)

Drupal- FAQ Module Preview


What is the FAQ module?

The FAQ module is a Drupal module that gives Drupal site the ability to add an FAQs section easily,

What features does the FAQ module offer?

The FAQ module offers a lot of features that allow Drupal Site Developers and Administrators to customize the look and feel of their FAQs page

Such features include:

  1. The ability to add FAQ questions and Answers
  2. The ability to add details to the question, like a longer question description
  3. The ability to customize how the questions and answers are listed and a total control over their appearence
  4. The ability to categorize FAQs and list them by categories
  5. The ability to customize category listings and even add a count of FAQs in each category

Steps to install and configure the FAQ module:

  1. Download the module from http://drupal.org/project/faq
  2. Extract it in the sites/all/modules directory in your site
  3. Navigate to yourdomain.com/admin/build/modules and enable the moduleEnable FAQ module
  4. Navigate to yourdomain.com/admin/user/permissions and configure the FAQ module permissionsConfigure the faq module permissions
  5. Navigate to yourdomain.com/admin/settings/faq
  6. Enter a description that will appear on the top of your FAQ pageFAQ admin page
  7. Navigate to the Questions tab to edit how you would like questions to appear on your FAQs pageConfigure questions page
  8. To add question categories, Navigate to the yourdomain.com/admin/content/taxonomy and click Add VocabularyAdd FAQ taxonomy
  9. Enter your category name and description, and select the FAQ content typeAdd an FAQ category
  10. Add some terms to the new created vocabulary, by clicking the add terms link near the created vocabulary nameAdd terms to the FAQ vocabulary
  11. Navigate to yourdomain.com/admin/settings/faq/categories and select Categorize questions, then configure how you like the categories to appear Configure FAQs categories
You can create a lot of FAQs and categorize them and totally customize their appearance using this module.

How to redirect users after login in drupal?


Step 1 : Enable the trigger module if you haven’t done so. (To enable the trigger module, go to administer->site building->module. check the trigger module and press save.)

Step 2 : Go the administration panel and click on action. Under Make a new advanced action available, select Redirect to URL… and hit create.

Enter a description and the url to redirect to. You can use internal url like node/123 to redirect the user on login.

Press Save.

Step 3 : Go to the administration panel and click on triggers under site building. Select users in the tab.

Under Trigger: After a user has logged in, select the trigger you have just created and hit assign.

Logout and log back in to test.

Thanks!!

How to Create a Custom Front Page in Drupal 7


Step 1: Install the module Front Page

Step 2: Configure

Go to Administration > Configuration > Front Page

By default, Front Page installed on a blank installation of Drupal 7 will give 3 options for settings, Administrators, Authenticated Users, and Anonymous Users. Any additional roles you have created should also show up here. You can set a custom home page for each of your users. I find it easiest to set it for an anonymous user and test in a separate browser as an anonymous user.

You have a few options with how much control over the front page you give yourself (these are copied from the module itself):

themed: means your default layout, theme and stylesheet will be loaded with your custom front_page.
full: allows you to have a completely different layout, style sheet etc.
redirect: will automatically redirect visitors already logged in to a specific page specified in the REDIRECT TO box.
alias: will display the page listed in path as if it were the home page. This option does not redirect.
        I use the “full” setting. I create my homepage in an html editor on my local machine, put the CSS styles in the header (you can link it to an external stylesheet later if you’d like), and test it out as a standalone page. Then, once you are pleased with the result, paste the entire html document into the “data” textarea. This textarea works just like any other textarea in any other drupal node. So you may choose full html, restricted, or whatever text format types you have created..
Thanks..

Using the Taxonomy Module


What is Taxonomy?

Taxonomy, a powerful core module, gives your sites use of the organizational keywords known in other systems as categories, tags, or metadata. In Drupal, these terms are gathered within “vocabularies.” The Taxonomy module allows you to create, manage and apply those vocabularies.

Taxonomy Settings:

In Drupal 7, the Taxonomy module is turned on, by default. In earlier versions of Drupal, you can enable the Taxonomy module on the modules page (Administer > Site building > Modules).

In Drupal 7 —-> Administer > Structure > Taxonomy.

In Drupal 6 —->Administer > Content Management > Taxonomy.

In Drupal 5 the naming of the Taxonomy module is inconsistent across the administrative interface. On the Administer > Build > Modules page, for example, the module is called Taxonomy. However vocabularies are administered through the Administer > Content management > Categories page.

Setting up Taxonomy

  • administer taxonomies at administer > content management > Taxonomy.
  • decide who else can administer the Taxonomy module at Administer > User management > Permissions.
  • add a vocabulary at Administer > Content management > Taxonomy > add vocabulary.

Thank u

PHP File upload


Hi

this post shows u How to upload a file using php script…

In this tutorial create 2 files
1. upload.php
2. upload_ac.php.
Step 
1. Create file upload.php.
2. Create file upload_ac.php.
3. Create folder “upload” for store uploaded files.

4. CHMOD your upload folder to “777” by using your ftp software(change permission).


First create a input box for getting file .

Coding:

<table width=”500″ border=”0″ align=”center” cellpadding=”0″ cellspacing=”1″ bgcolor=”#CCCCCC”>
<tr>
<form action=”upload_ac.php” method=”post” enctype=”multipart/form-data” name=”form1″ id=”form1″>
<td>
<table width=”100%” border=”0″ cellpadding=”3″ cellspacing=”1″ bgcolor=”#FFFFFF”>
<tr>
<td><strong>Single File Upload </strong></td>
</tr>
<tr>
<td>Select file
<input name=”ufile” type=”file” id=”ufile” size=”50″ /></td>
</tr>
<tr>
<td align=”center”><input type=”submit” name=”Submit” value=”Upload” /></td>
</tr>
</table>
</td>
</form>
</tr>
</table>


Next create a upload_ac.php file

<?php
//set where you want to store files
//in this example we keep file in folder upload
//$HTTP_POST_FILES[‘ufile’][‘name’]; = upload file name
//for example upload file name cartoon.gif . $path will be upload/cartoon.gif
$path= “upload/”.$HTTP_POST_FILES[‘ufile’][‘name’];
if($ufile !=none)
{
if(copy($HTTP_POST_FILES[‘ufile’][‘tmp_name’], $path))
{
echo “Successful<BR/>”;

//$HTTP_POST_FILES[‘ufile’][‘name’] = file name
//$HTTP_POST_FILES[‘ufile’][‘size’] = file size
//$HTTP_POST_FILES[‘ufile’][‘type’] = type of file
echo “File Name :”.$HTTP_POST_FILES[‘ufile’][‘name’].”<BR/>”;
echo “File Size :”.$HTTP_POST_FILES[‘ufile’][‘size’].”<BR/>”;
echo “File Type :”.$HTTP_POST_FILES[‘ufile’][‘type’].”<BR/>”;
echo “<img src=\”$path\” width=\”150\” height=\”150\”>”;
}
else
{
echo “Error”;
}
}
?>


Finally Change the permissions like below

This example, I use WS-FTP, right click at upload folder > FTP Commands > CHMOD(Unix)


We r done!!

Thank youu

Increase File-Upload Limitations in Drupal


Hi,  this post shows file upload settings

You can modify File Upload  settings easily through your Drupal administration menus.

  • File Upload Roles First, mouse over the “Site configuration” drop-down menu, then select “File uploads”. Now you’ll see some adjustable file size permissions for each user role, and global upload settings under “General settings”.
  • File Upload Settings If a user role needs ability to upload files of a particular size, just adjust the “Default maximum file size per upload” setting. If a user role needs a larger cumulative file upload size (for ALL the files, not just each one), then you can adjust the “Default total file size per use” setting..

A Simple Rating System in PHP (continued)


this step shows you how to processing the votes that are given by the visitors..

 //We only run this code if the user has just clicked a voting link 
 if ( $mode=="vote") {   
  //If the user has already voted on the particular thing, we do not allow them to vote again 
 $cookie = "Mysite$id"; 
 if(isset($_COOKIE[$cookie])) {
 Echo "Sorry You have already ranked that site <p>"; }
 //Otherwise, we set a cooking telling us they have now voted   
 else { $month = 2592000 + time(); setcookie(Mysite.$id, Voted, $month);   
  //Then we update the voting information by adding 1 to the total votes and adding their vote (1,2,3,etc) to the total rating 
 mysql_query ("UPDATE vote SET total = total+$voted, votes = votes+1 WHERE id = $id"); Echo "Your vote has been cast <p>"; }

Note: 
This code should be placed below the database connection, but above the rest of the script..

we place a cookie in their browser before we update the database. If we detect this cookie is already there, the script will not let the user vote again. Otherwise, the information is updated. If your site’s users need to register  to be able to rank, a better way to prevent multiple votes would be to store this information right in the database and not as a cookie.

we are done!

A Simple Rating System in PHP


Hi,

This post shows you, how to create a simple rating system using php script..

It’s very simple…

Let’s start.

Before we begin we need to create a MySQL database table to hold the ratings information. We are only creating four fields: a unique ID, the name of what we are rating, and 2 columns to hold voting information.

CREATE TABLE vote (id INT(4) NOT NULL AUTO_INCREMENT PRIMARY KEY, name VARCHAR(30), total INTEGER, votes INTEGER)
We will also need to put some data into the database to work…
INSERT INTO vote (name, total, votes) VALUES ( "First item", 45, 10 ), ( "Second item", 15, 4 ), ( "Third thing", 25, 7 ), ( "The Forth", 20, 5 ), ( "Fifth Thing", 0, 0 )..
<?php  // Connects to your Database 

mysql_connect("your.hostaddress.com", "username", "password") or die(mysql_error()); 
mysql_select_db("topbass_abouttest") or die(mysql_error());
 //Puts SQL Data into an array 
$data = mysql_query("SELECT * FROM vote") or die(mysql_error());
 //Now we loop through all the data   
while($ratings = mysql_fetch_array( $data ))
{
 //This outputs the sites name
  Echo "Name: " .$ratings['name']."<br>";   
  //This calculates the sites ranking and then outputs it - rounded to 1 decimal 
 $current = $ratings[total] / $ratings[votes]; 
 Echo "Current Rating: " . round($current, 1) . "<br>";     
 //This creates 5 links to vote a 1, 2, 3, 4, or 5 rating for each particular item 
 Echo "Rank Me: "; Echo "<a href=".$_SERVER['PHP_SELF']."?mode=vote&voted=1&id=".$ratings[id].">Vote 1</a> | ";
 Echo "<a href=".$_SERVER['PHP_SELF']."?mode=vote&voted=2&id=".$ratings[id].">Vote 2</a> | "; 
 Echo "<a href=".$_SERVER['PHP_SELF']."?mode=vote&voted=3&id=".$ratings[id].">Vote 3</a> | "; 
 Echo "<a href=".$_SERVER['PHP_SELF']."?mode=vote&voted=4&id=".$ratings[id].">Vote 4</a> | "; 
 Echo "<a href=".$_SERVER['PHP_SELF']."?mode=vote&voted=5&id=".$ratings[id].">Vote 5</a><p>"; } ?>
The code above connects to the database, and retrieves the information on all of the items we are rating. It then displays it, and gives the users the option to place their vote. You could easily apply some nice HTML formatting around this if you wanted, or replace the text vote links with images..
We will see the Remaining script  upcoming posts…
 Thanks!


PHP-Using Switch to Display Random Quotes


Hi,

This code demonstrates how to use switch to display a random quote on your website. Each of our quotes is set to run in the case that it’s number is chosen. By using  rand() to choose a random number, we are able to display one of the quotes at random.
Simple Program:
<? //Chooses a random number $num = Rand (1,6); 
//Based on the random number, gives a quote 
switch ($num) 
{
 case 1: echo "Time is money"; break;
 case 2: echo "An apple a day keeps the doctor away"; break;
 case 3: echo "Elmo loves dorthy"; break;
 case 4: echo "Off to see the wizard"; break; 
case 5: echo "Tomorrow is another day"; break;
 case 6: echo "PHP is cool!"; 

?> 
To add more quotes you would simply change the rand () function to allow for higher numbers, and then add in their corresponding cases below.

PHP Tutorials: How to change your website color based on the day of the week


Hi,

I’m going to show you simply how to change the background color based on the day of the week. You can take this one step further if you want and pull entirely different style sheets for each day. This would allow your website to feature your daily specials…
 Code:

<?php
$today = date(“l”);
print(“$today”);
if($today == “Sunday”)
{
$bgcolor = “#ffffff”;
}
elseif($today == “Monday”)
{
$bgcolor = “#ffff00”;
}
elseif($today == “Tuesday”)
{
$bgcolor = “#ff00ff”;
}
elseif($today == “Wednesday”)
{
$bgcolor = “#00ffff”;
}
elseif($today == “Thursday”)
{
$bgcolor = “#ff0000”;
}
elseif($today == “Friday”)
{
$bgcolor = “#00ff00”;
}
else
{ // Only Saturday remains
$bgcolor = “#0000ff”;
}
print(“<body bgcolor=\”$bgcolor\”>\n”);
?>

Run this php program in ur browser. C the Results…

I Hope this post will Help u…

Cumulus Module Installation and Configuration..


Intro About Cumulus Module:

Cumulus allows you to display your site’s tags using Flash that rotates them beautifully in 3D. It works like a regular tag cloud, but is more visually exciting…

The 12 steps to get up and running

  1. Download the project from http://drupal.org/project/cumulus
  2. Unpack and upload the project to your ‘sites/all/modules’ directory
  3. Using the editor of your choice, create a new file named cumulus.js
  4. Point your browser to either http://pratul.in/files/cumulus.js orhttp://pratulkalia.googlepages.com/cumulus.js
  5. Copy the javascript code to your new cumulus.js file and save.
  6. Upload the new cumulus.js file into the cumulus module directory at ‘sites/all/modules/cumulus’
  7. Enable the module at ‘admin/build/modules’
  8. Gather id’s of taxonomy vocabulary that you want cumulus to operate on by navigating to ‘admin/content/taxonomy’ (Drupal 6.x) or /admin/structure/taxonomy (Drupal 7.x). Hover over the “edit vocabulary” operation link (Drupal 6.x) or go to admin/structure/taxonomy/tags (Drupal 7.x) to see the vocab id in the browser status bar. In the case that your browser has no status bar, you can also click the “edit vocabulary” link and then read the vocabulary id out of the url.
  9. Enable your first Cumulus block at ‘admin/structure/block/add-cumulus-block/’ . Insert the id’s you want from the vocabulary into the field “Vocabulary IDs to be included” as comma separated values.
  10. Modify user permissions at ‘admin/user/permissions’ to your needs
  11. And finally, do any other visual configurations to the block as you see fit…

Cumulus is a great project but installing and configuring it can be a bit more challenging than many other modules. Well worth the time spent though!


Sample ScreenShot: 

Cumulus


Working with menus


Menu:

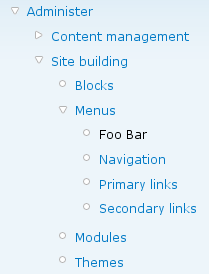
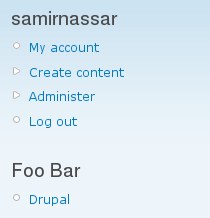
Drupal 6 comes out-of-the-box with three menus. The first is the ‘Navigation’ menu, which is the one used to administer the site (it has the ‘My Account’ and ‘Administer’ links in it). There are also the ‘Primary’ and ‘Secondary’ menus, which show up in different places on the page (and, by default, are empty in a new Drupal installation). You can also add new menus, like ‘Footer Links’ or ‘Foo Bar’ or anything else you might like.

The next few steps show you how to add a new menu as well as how to add new items (links) to an existing menu.

Creating a new menu

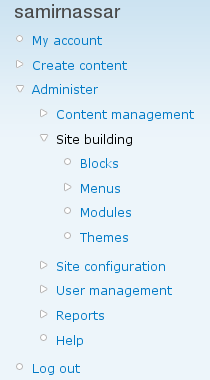
 Administer - Site building - Menu

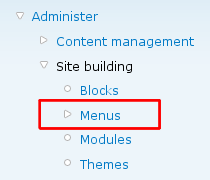
Start by going to the navigation menu and follow the links: Administer > Site building > Menu

 Administer - Site building - Menu with menu highlighted

You’ll end up at the Menus page

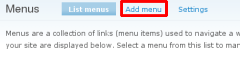
Screenshot of menu administration page

 add a menu

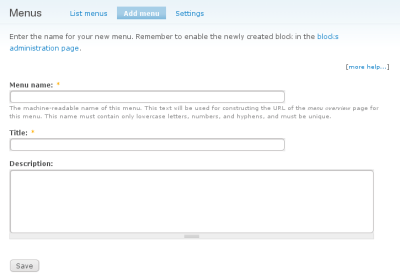
There are three fields: menu name, title, and description

 add a menu edit form


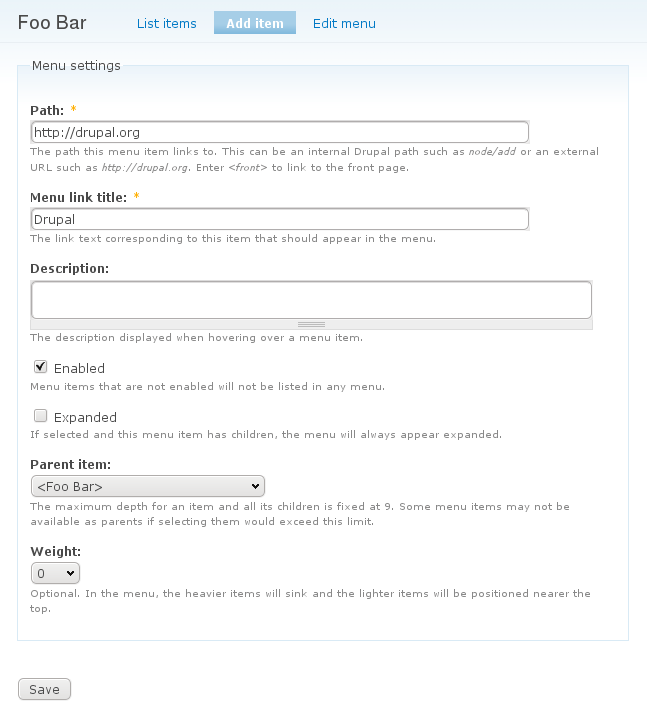
Adding a menu item to an existing menu

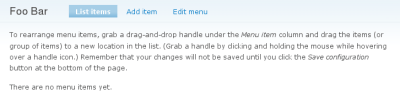
Click on the name of the menu you would like to edit. (If you created an entirely new menu per the above, the navigation menu will now show that new menu, e.g. ‘Foo Bar’.)


To add a new menu item, click the Add item link

Display your new menu

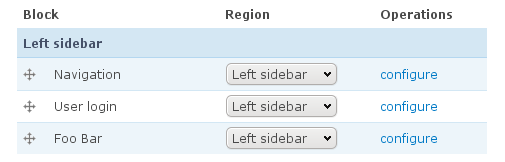
To display a new menu you will need add a Block display to your Drupal installation. To do so, go to Administer > Site building > Blocks and scroll down to the ‘Disabled’ section (where blocks that aren’t currently being displayed are managed). You can activate the Foo Bar block by dragging it to the left sidebar (or any other region). When complete, you should see:

Your left sidebar should now display Foo Bar followed by the link you specified

“Teasers” – short summaries of node content


Hi, Today  post shows u information about “teaser”..

A teaser is a short piece of text, usually the first paragraph or two of an article. This text is then displayed in most lists, including the default home page (/node). Many modules (including Views) are designed to work with node teasers, and the concept of a “teaser” vs the node “body” is integral to the workings of Drupal core and the Drupal UI.

The length of the default teaser can be modified. You will be able to change the number of words after which Drupal attempt to break the text cleanly. When the length of the content exceeds the set limit, a link to “Read More” will automatically be displayed. In Drupal 6, click Administer > Content management > Post settings.

In Drupal 7, the instructions are a little more complex, but you get more flexibility as this setting can be changed on a per-content type basis.

  1. click Administer > Structure > Content types.
  2. click the “Manage display” link for the content type you wish to edit
  3. click “Custom Display Settings” to drop down its settings
  4. make sure “Teaser” is enabled. Save the content type if you had to make a change.
  5. you should see a “Teaser” sub-tab. Click it.
  6. make sure the Format is set to “Summary or trimmed”.
  7. click the gear widget on the right side of the settings
  8. set the trim length and click “Update”
  9. click the “Save” button

Some modules help you to display different content, or different versions of that content in ‘teaser’ view vs full ‘body’ view. image.module for example inserts a thumbnail of an image into the teaser, while you see a page-sized version when viewing the node.

CCK provides many features under Administer › Content management > Content typesallowing you to fine-tune what does and doesn’t show as a teaser.

Understanding Path and Menu Navigation in Drupal


The menu is a way to bring visitors to explore the content, while the path is a url address of a content.

In the context summapro website,

This is the path –> http://mysite.com/node/218 and primary links is a menu which contains links item such as:  Home – Tutorials Drupal – Drupal Sites – Drupal Books – Web Building.

By default, Drupal provide 3 menus : Navigation, Primary Links and Secondary Links. You can access it on the Admin -> SiteBuilding -> Menus. In each menu, you can add links as many as you like.
HOW TO ADD A MENU.

Not just links, but you also can add menus which is not restricted by amount, suppose we create a Menu that we named Addition Links.

Go to Admin -> SiteBuilding -> Menus and clickAdd Menu tab, input all necessary text as picture below and then Save.

Then go to admin -> sitebuilding -> blocks. Find a new block named Addition Links and place it on one block regions, eg Right Sidebar. So far,  this menu block that you created earlier is still not visible. Why? Because the menu has not contained any link.

TWO WAYS HOW TO ADD A LINK MENU FOR NODE.

If you create content such as content Page, you can create a link in 2 ways : Directly when creating content or Through Menu Configuration.

Keep in mind that when you create content and click Save button, Drupal will automatically give you a path. This path will be visible on your browser url address. You will not be able to create a link menu if the path does not exist.

Now back to the way how to add a link, we start with first way.

First Way : Add a Link Menu Directly When Creating Content.

Go to Create Content -> Page, Fill in the Title as below picture. On the Menu link title, you immediately create a menu link called Link No. 1, then on Parent Item section, make sure the link is located on Addition Links menu (a new menu we’ve created earlier)

Click the Save button. After that, Drupal automatically provides you a path. On my site, drupal gave node/219. See picture below.

Now we can see on the right sidebar regions where we place Links Addition menu. As a result, Additional Links menu will appear because it has contained a link. This link is Link No. 1.


Second Way :  Add a Link Menu Through Menu Configuration.

We turn to make the second content. Go to Create Content -> Page. Fill in the Title as picture below. On Menu link title, leave it empty. We purposely have not given any link title. On Parent item, whatever we choose, it will have no effect because the menu link title still empty. Click Save button.

After pressing the save button, this time drupal automatically gives you a path, that is node/220, you can see it on url address of your browser. See picture below.


Then we go to Admin -> Sitebuilding -> Menus, click Addition Links on the list. The result will look like the picture below. On the tabs that line the top, click Add item tab as indicated by red arrows.


Next we are taken to a page like the picture below. Remember earlier that we created a new content which path is node/220. On the path, we fill node/220 and on the menu link title we fill Link No.2. Then Save.


Now Link No. 2 has been created. You can see it on Addition Links block. See picture below.


The two ways above how to add link menu can be applied on Primary Links menu, Secondary Links and Navigation.


Thanks…..

Using Quicktabs Module for Drupal Page Efficiency


Module Overview:

Using Quicktabs Module for Drupal Page Efficiency

                    Quicktabs is a module that arranges and combines the block (s), node (s), and views display with navigation tabs. If we click on one menu navigation, the pages open without having first processed on the server. Its function is to save page spaces. If you usually put the USER LOGIN block and the WHO’S ONLINE block in one region, then these two blocks will take 2 block space. Now with Quicktabs, 2 blocks are organized in overlapping and eating space with just 1 block.

Quicktabs itself capable of arranging more than 2 blocks. Sorry I forgot, not only blocks that can be arranged but one quicktabs can also be combination of nodes, views, and quicktabs itself.

The end of quicktabs configuration will  generate a new block which we will put on one region.

Quicktabs also provides several styles. You try after successful practicing this tutorial. Does not match the style provided? you can create your own style by modifying one of which is provided with a CSS style.

In this tutorial case we will try to make one quicktabs contains 3 tabs, which will combine a single block, a single node and single views. Style selected is zen.

Quicktabs tutorial stages.

  • Install Quicktabs in sites / all / modules directory
  • Enable Quicktabs module in admin -> sitebuilding -> modules
  • Go to Admin -> Sitebuilding -> Quicktabs, Choose newqtblock
  • Edit new quicktabs as our needs..

then,

  • Go to admin–>sitebuilding–>blocks, find quicktabs sample block and put in one of your theme region.

Now you can see of your work as final result screenshot.

Hope this tutorial easy to practice.


Attachment Views : How to Combine Two Views or More in one Page


Attachment Views is a way to combine two or more views on one page. For that, using the block as a technique to display two or more views can be avoided.

Results of Attachment Views can be seen in the screenshots above. The lower part is an ordinary Views  (marked with a red box) which I will call the primary views, while the top is Attachment Views(marked with blue boxes), let we call it secondary views.

The basic principle is to make 2 views, build primary Views first and then create secondary Views as attachment Views. The both views has same techniques in building Views process. The differentiation only when we set secondary views asAttachment display, not page.

When asking how you set attachment views display, this 2 items below must be considered:

  • One, where will we place the attachment views into primary views. Is its position before or after the primary views. In this tutorial,  we put attachment views on position before to primary views.
  • Twosupposed we have built more than one views on a views settingwe must also determine which primary views will be attached by attachment views.

To create attachments views, we must first understand how to create views. Previously I’ve explained step by step in building the views. You can see it onhttp://summapro.com/drupal-tutorials/how-to-create-a-drupal-views.To be more brief, we will not discuss the process of building a primary views in details here. No addition module required to make attachment views, it just same modules that required by primary views.


Steps to make attachments views:

1. First, creating a primary Views named Celebrities Attached on Admin–>Site Building–>Views. Click Add tab.

On Basic Settings

  • Name : Celebrities Attached
  • Title : Celebrities
  • Style : HTML List
  • Use Pager : Yes
  • Item per Page : 4


Fields

  • Node Title
  • Content Specialization


Filters 

  • Node Published : Yes
  • Node Type : Celebrities


2. After primary views has been built, then we create an attachment views by adding a display.

  • Select Attachment (marked with blue arrows).
  • Then click Add Display button (marked with red arrows).

BASIC SETTINGS

  • Name : Celebrities Attacher
  • Title  : Celebrities
  • Style : Table
  • Item per Page : 4


FIELD

  • Node Title
  • Content : Specialization
  • Content : Performing Rate


FILTERS

  • Node Published : Yes
  • Node Type : Celebrities.


3. Then we go to Attachments Settings.

Click Attach to : None. Choose Celebrities Attached

Then choose Position : Before

Click Update Button and then click Save.

Done …! See your work now.

Webform : Drupal Form to Get Feedback from Visitor


You can create forms on your website to get feedback from your site visitors or just to receive online purchase orders. Next, the feedback or the order information will be received in our email. One of the most frequently forms module used by Drupal web developer is Webform.

PREPARATIONS

  •   Download Webform and Webform Report from drupal.org.
  •   Install on the folder sites / all / modules
  •   Make it enabled on the admin -> site building -> modules
  •   Arrange permissions on user management -> permissions

PRACTICING
Picture below represents the results of the Webform. In this case, we create forms to get information about visitor. This is simple questions such as name, sex, email, age, favorite cms, country and message / comment box.


According to the picture above, we will create forms where visitor can enter text, select the radio button, fill checked on a check list and select a list box.. See details on picture below, especially on type column.


The two process on using Webform:

  • Webform Configuration Page. 
  • Creating Form Components.

I. SET THE CONFIGURATION PAGE

Go to Create Content -> Webform and the page will appear as picture below.

There are many items must be configured. For basic purpose, we only configure some most important items and leave the others in default position.

  • In Menu Settings box  –> Menu Link TitleFeedbackParent Item<Primary Link>
  • In Webform Settings box–>  Title -> Your Feedback
  • DescriptionWe Want to know about you guys, Please fill the form below.
  • In Webform Mail Settings box: -> Email to address: (input your email addresses, it can be more than one, separated by comma)
  • In Webform advanced settings box -> Submit button textSend
  • In Publishing Options box -> Published(checked)Press the Save button.

.


II. CREATING FORM COMPONENTS

After press Save button,  we are  automatically taken to FORM COMPONENTS page. See the picture below, the red circle marks confirms this.


Before adding your component form, let me describe them shortly.

There are 6 columns:

  1. Name, this is the form name you’ve created
  2. Type, this is form type such as textfield, text-area, select, email, date, etc.
  3. Value(nothing to tell)
  4. Mandatory: If you checked this, your site visitors required  to fill this form. Your form will be marked by red asterix.
  5. Email, this form information will be received in our email.
  6. Operations : Edit Delete Clone. ,, (You know that)


FILL FORM COMPONENTS ONE BY ONE

1. Now on the first form you fill in

  • Name: Information
  • Type: fieldset
  • Mandatory: none

Then click  Add button

After that we are taken to Edit Component: Informationa (Name)  page..

Fill in Description column : You can put additional information here. You can put additional information here.  you can put additional information here.

Leave the other columns by default. Click Submit button.

Now you”re succesfull to create one form. Then we’ll create the second form.

2. In the second form you fill on

  • Name: Name
  • Type: textfield
  • Mandatory: Checked

Click  Add button

Then we’re taken to a page that is Edit Component: Name. Leave it in default condition (no change). ClickSubmit button.


3. In the form you fill in at third

  • Name: Email
  • Type: email
  • Mandatory: unchecked

Click Add button

On Edit Component: Email (email), leave it in default condition.

Click Submit button.,

4. In the form you fill in the fourth on

  • Name: Sex
  • Type: select
  • Mandatory: checked

Click Add button

On Edit Component: Sex (Select) page, Fill  in Options box:
Male
Female

See how to fill the options box. After one option typed, you must press Enter. (See picture below)

Next click Submit button.


5. In the fifth form you fill on

  • Name: CMS Favourite
  • Type: select
  • Mandatory: checked

Click  Add button

On the Edit components: CMS Favourite (Select) page,
Fill in the Options box:
Drupal
Joomla!
DotNetNuke
WordPress

see picture below


Then in the Description box, fill … “You can choose more than one CMS”
Put a check on Multiple check list

see picture below


Description means there will be additional text under the form. It will guide visitor how to fill the form.

Results of choosing Multiple options will display your form as a checklist. Visitors could select more than one option.

Now click Submit button.

6. On sixth-form, you fill in

  • Name: Country
  • Type: select
  • Mandatory : checked

Click the Add button

On Edit Component: Country (select) …
You fill in the Options box
USA
England
Canada
Germany
French
Indonesia
Others

Then put a check on Listbox selection.
Click the Submit button.

Listbox means we will display the options as drop down list. Visitors must choose one of these options.

7. In seventh form, you fill in

  • Name: Message / Comment
  • Type: textarea
  • Mandatory: unchecked

Click Add button

On Edit Component: Message / Comment (textarea) page,  let it in default condition. Click Submit button.

Textarea is different from textfield. Textarea give chances to website visitors to fill text with more characte.
Now you have complete component as picture below.


If there is a sequence of components that don’t fit, you can drag and drop the asterix sign on left side. (see the pink area on picture above).

Last time, click the Submit button.


Now you can see the results by clicking Feedback menu on primary link.

Hopefully this explanation easier to understand.

 Final Result will look like
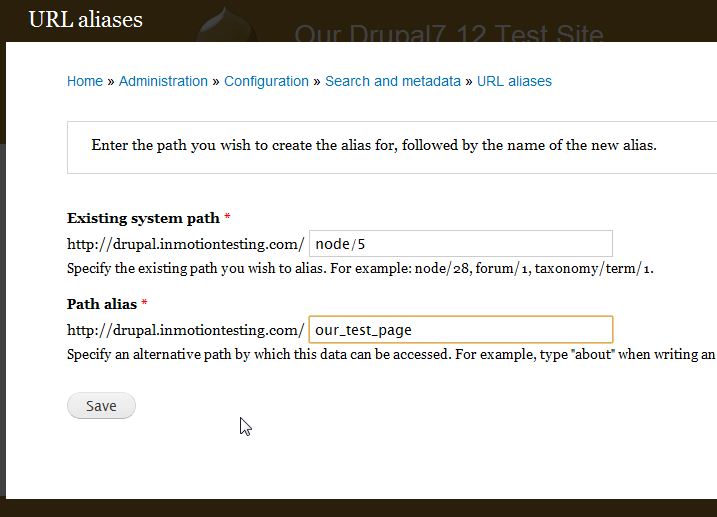
Jquery program switch button


Already we saw some fantastic scripts using jquery,

I.m happy to share another one script in jquery..

This script shows an output look like real switch (on/off)..

To do this, we need one js lib file and one switch image..

Lets”s start.

Coding:

<html>
<head>
<title>jQuery UI Switch</title>
<link href=”../style.css” rel=”stylesheet” type=”text/css” />

<style>

#container{background:#ebebeb;}

.switch{
border:none;
background:left no-repeat;
width:105px;
height:46px;
padding:0;
margin:0;
}

.on, .off{
width:50px;
height:40px;
display:inline-block;
cursor:pointer;
}

.result{display:none; margin-top:5px; font-size:14px; color:#333;}
.result span{color:#C03; font-weight:700;}

</style>

<script src=”https://ajax.googleapis.com/ajax/libs/jquery/1.6.4/jquery.min.js&#8221; type=”text/javascript”></script>

<script type=”text/javascript”>

$(document).ready(function(){

$(‘.switch’).css(‘background’, ‘url(“switch.png”)’);
$(‘.on_off’).css(‘display’,’none’);
$(‘.on, .off’).css(‘text-indent’,’10000px’);

$(“input[name=on_off]”).change(function() {
var button = $(this).val();

if(button == ‘off’){ $(‘.switch’).css(‘background-position’, ‘right’); }
if(button == ‘on’){ $(‘.switch’).css(‘background-position’, ‘left’); }

$(‘.result span’).html(button);
$(‘.result’).fadeIn();

});

});

</script>
</head>

<body>


<form action=”” method=”get”>

<fieldset class=”switch”>
<label class=”off”>Off<input type=”radio” class=”on_off” name=”on_off” value=”off”/></label>
<label class=”on”>On<input type=”radio” class=”on_off” name=”on_off” value=”on”/></label>
</fieldset>

<input type=”submit” value=”Submit”/>

</form>

<div class=”result”>The switch is: <span>on</span></div>
</body>
</html>


Output:

when we click ON, the msg will be displayed The switch is:on

when we click off, the msg will be displayed The switch is:off


« Older entries

Design a site like this with WordPress.com
Get started